A well-made chocolate cake often stands as a benchmark for home bakers. The combination of a tender, moist crumb and a glossy, smooth ganache can be achieved by understanding the role of each ingredient and the techniques involved. This article outlines a step-by-step approach to preparing a classic chocolate cake with a rich chocolate ganache topping.
The focus here is on the process itself: how ingredients interact, why certain methods are used, and how adjustments may be made depending on variables such as oven performance or cocoa powder type. By following the described steps carefully, bakers can develop a reliable foundation for this dessert. The goal is not to promise a perfect result every time, but to offer a clear, reproducible method that accounts for common factors in a home kitchen.
From selecting the right cocoa to achieving the ideal ganache consistency, each phase builds on the previous one. The following sections cover ingredient preparation, batter mixing, baking, ganache making, assembly, and storage. Paying attention to each stage can contribute to a more consistent outcome.
Ingredients and Preparation
The quality of ingredients influences the final texture and flavor of the cake. For the cake, all-purpose flour, unsweetened cocoa powder, granulated sugar, baking powder, baking soda, salt, eggs, buttermilk, vegetable oil, vanilla extract, and hot coffee or hot water are typically used. Cocoa powder with a higher fat content, such as Dutch-process, may yield a deeper color and a slightly different flavor profile compared to natural cocoa. Buttermilk provides acidity that reacts with baking soda for leavening and contributes to a tender crumb. The hot liquid helps dissolve the cocoa and activates leavening reactions.
For the ganache, heavy cream with a fat content of at least 35% and high-quality semisweet or bittersweet chocolate are recommended. Chopping the chocolate into uniform pieces ensures even melting. Cream should be measured precisely, as the ratio of cream to chocolate determines the final thickness and set of the ganache.
Preparation steps include greasing and lining cake pans with parchment paper, preheating the oven to 350°F (177°C), and sifting together the dry ingredients to remove lumps. Room temperature eggs and buttermilk incorporate more evenly into the batter, which may affect the cake’s rise and texture.
Mixing the Batter
Mixing technique for this type of cake typically follows the reverse creaming method or a simple one-bowl approach. In one common method, dry ingredients are combined in a large bowl, then oil and buttermilk are added along with eggs and vanilla. The batter is mixed until just combined, then hot coffee or water is stirred in to thin the batter to a pourable consistency.
Overmixing after adding flour can develop gluten, which may result in a denser, tougher crumb. Therefore, mixing should be done until the ingredients are incorporated, and any remaining lumps should be minimal. The hot liquid is added last, and the batter will be quite liquid. This is normal and helps the cake stay moist during baking.
Dividing the batter evenly among prepared pans can be done using a kitchen scale for accuracy. An uneven distribution may lead to layers of different heights, which can affect assembly later. A spatula can help level the batter once poured.
Baking
Baking time depends on pan size, oven calibration, and altitude. Two 8-inch or 9-inch round pans typically bake for 25 to 35 minutes at 350°F (177°C). A toothpick or cake tester inserted into the center should come out with a few moist crumbs, not wet batter, when the cake is done. The edges may pull away slightly from the pan, and the top should spring back when lightly pressed.
Rotating the pans halfway through baking helps promote even browning, especially in ovens with hot spots. After removing from the oven, the cakes should cool in the pans on a wire rack for 10 to 15 minutes before being turned out onto the rack to cool completely. Wrapping the cooled cake layers in plastic wrap for a few hours or overnight can make them easier to handle and may improve moisture retention.
Note: If the cake domes excessively during baking, the layers can be leveled with a serrated knife once cool. An oven thermometer can help verify the actual temperature inside the oven.
Making the Ganache
Ganache is an emulsion of chocolate and cream. The standard ratio for a pouring ganache that firms to a spreadable consistency is approximately 1:1 by weight, or slightly more chocolate for a thicker result. For a rich, non-drip glaze, many recipes use a 2:1 ratio (chocolate to cream) or an intermediate proportion.
To prepare, heat the cream in a small saucepan until it begins to simmer, with small bubbles forming around the edges. Do not let it boil vigorously, as this can cause separation. Pour the hot cream over the chopped chocolate in a bowl. Let it sit for about a minute to allow the heat to melt the chocolate, then stir gently from the center outward until the mixture is smooth and glossy. If some chocolate remains unmelted, the bowl can be placed over a pot of simmering water for a few seconds or warmed in a microwave in short bursts.
For a smoother finish, the ganache can be strained through a fine mesh sieve to remove any unincorporated chocolate pieces. This step is optional but can be helpful. The ganache should cool to a consistency that allows it to be poured or spread. Stirring occasionally as it cools can prevent a skin from forming.
Assembling and Frosting
Once the cake layers are completely cool, they can be assembled on a cake stand or plate. A small amount of ganache can be spread on the first layer to secure it. An even layer of ganache, about 1/4 to 1/2 inch thick, is then applied between each layer. A turntable or lazy Susan can make the spreading process more even, though it is not essential.
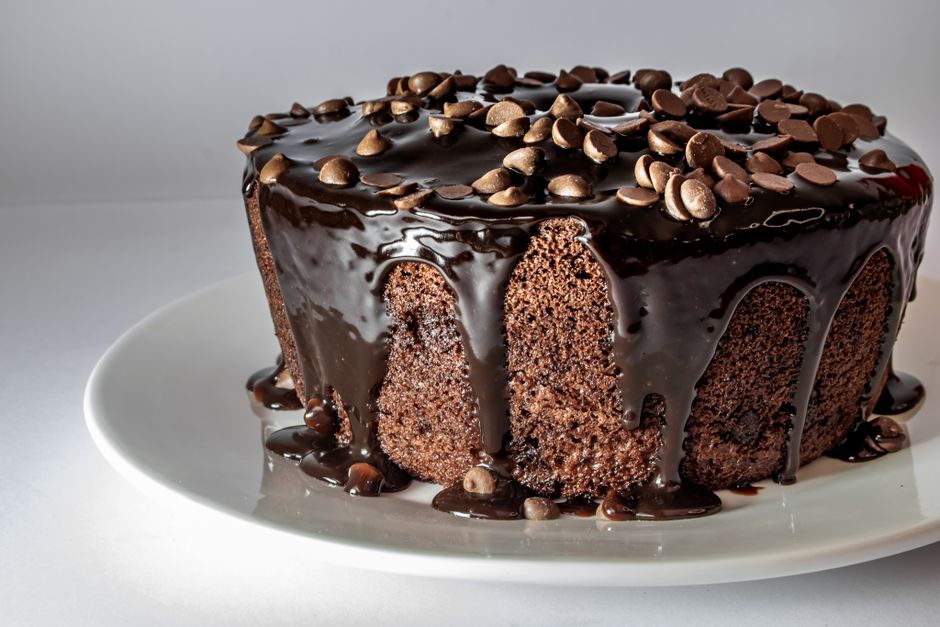
For a fully coated cake, a crumb coat of thin ganache should be applied over the entire cake and then chilled for about 15 to 20 minutes to set. This helps trap any loose crumbs before the final layer. The remaining ganache can be warmed slightly if it has become too thick, then poured over the top of the cake. Using a spatula, the ganache can be guided to flow down the sides evenly. For a perfectly smooth surface, excess ganache can be scraped off with a bench scraper or offset spatula while the cake rotates.
The assembled cake can be refrigerated to set the ganache completely. Allowing it to come to room temperature before serving often improves the texture of both the cake and the ganache.
Storage and Serving Suggestions
This chocolate cake with ganache can be stored in an airtight container at room temperature for up to two days, or refrigerated for up to five days. Before serving, the cake should be brought to room temperature for about an hour to soften the ganache and restore the cake’s moisture. If refrigerated, the cake may become firmer; letting it sit at room temperature helps the texture return to a softer state.
Ganache can also be used in other ways: leftover ganache can be rewarmed and used as a sauce for ice cream or fresh fruit. The cake itself may be paired with a dollop of whipped cream or a side of berries for contrast. Bakers may adjust the recipe by substituting different chocolate percentages, adding espresso powder to the batter, or using a gluten-free flour blend, though such changes will likely affect the final structure and should be tested for consistency.
Understanding the methods behind each step can help bakers adapt the recipe to their own kitchen conditions. With careful attention to ingredient temperature, mixing times, and cooling processes, a classic chocolate cake with rich ganache can be a rewarding project for any home baker.